CAV'S WONDERLAND
Welcome to the blog of all time!
Modern Hardware in an iMac G3 from 2000
Me and a friend violate a happy and round computer, November 30, 2023
Ok, so this project was something me and a friend had been wanting to work on for a long while, and she finally decided to go out and buy a red iMac G3 from eBay-dot-com.

The goal of the project: to shove elegantly place modern computer components into the G3’s cadaver. But before any of that could happen, the case had to be gutted of all its glorious 20+ year old innards. Fun fact: the vast majority of that case is taken up by the CRT monitor, and the computer and power circuitry only occupy the lower quarter of the case.
Taking out the CRT was a trial of fear for my friend, because I may have layed on the implosion risk and high voltage warnings a bit too thick. Nonetheless, armed with a youtube tutorial and a rubber dishwashing glove, I disarmed the CRT by pulling out the anode connector cap. (It was actually pretty quick and easy, but always take proper precautions when dealing with old CRTs). Now the harder part was actually getting the CRT out of the computer case. There were many hidden screws, cords, and little tabs that get caught, but it was able to be wrestled out eventually, and placed in its new home: a cardboard box.
Next up is getting past a metal plate/separator that is blocking the way to the computer itself. It is taken care of easily with just some screws and manuvering, and the motherboard is mounted to the back of it.

It’s a pretty funny looking motherboard, a DV model from 2000. It has a soldered 400 MHz single core processor with a separate FPU, 64 MB of RAM, and ATI Rage 128 Pro graphics, and it too shall live in the fated cardboard box cuddling the CRT. After that, the last thing to get out of the case is the bulbous little speakers that took a youtube tutorial and 20 minutes of trying to pull the damned things out.
Now, we have an empty shell of a computer, and some parts that absolutely were not made to go into said shell. However, the opinions of computer hardware are invalid, and so we set to thinking how to physically fit the new parts in. The case may look rather large from the outside, but the curves and pieces made it difficult to fit in even an ITX motherboard, RX 580, and ATX PSU, as well as a new LCD screen to replace the old CRT
So here is what was found out, via trial and error:
- The GPU cannot fit in the case with the screen when directly in the PCIe slot; we need an extender.
- The holes in the metal plate do not line up with holes on the motherboard in any way.
- The various plastic tabs and outcrops on the front facing plate block the screen from fitting; they will have to be dealt with.
- The PSU is bulky, and will only really fit in one spot with the motherboard in.
And so here are the solutions to these mounting problems. They are all janky, inexact, and haphazard, but they work.
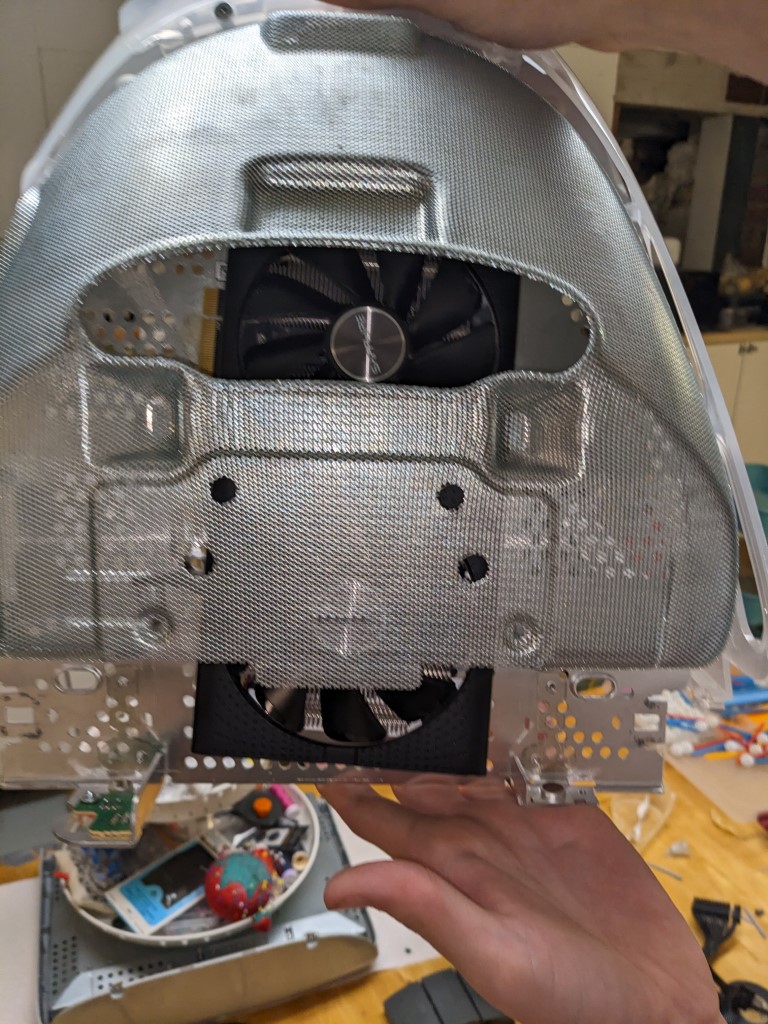
For the GPU, we decided to somehow mount it on the bottom, where the old motherboard was previously. For this important task, we enlisted the help of every pc builder’s best friend: zip-ties! Using random holes and heat pipes on the card, we attach it relatively firmly. Then we have to take it off and put it on twice more because it wasn’t aligned to the PCIe extender, which is fun. It’s a very tight fit, as there’s a mesh cage around the whole bottom layer, like this:
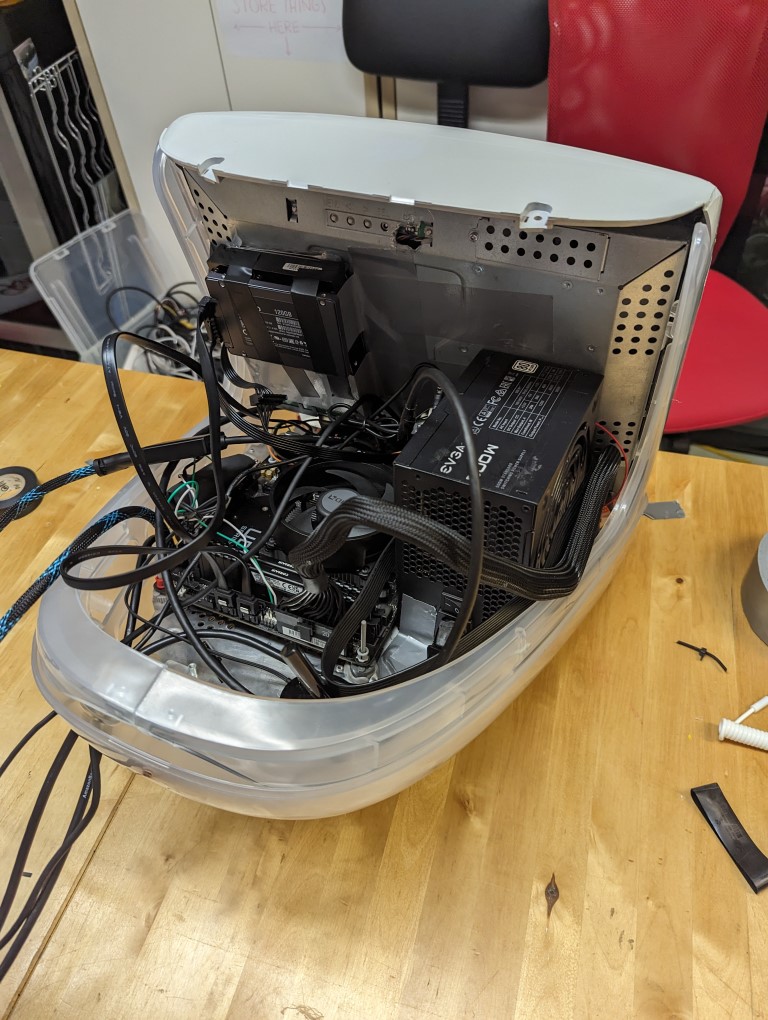
Now that the GPU is “mounted”, we can try and mount the motherboard and PSU up top. Seeing as the holes in the plate do not line up with the holes in the board, and we do not have any sort of metal fabrication/drilling tools, we will instead use Legos and Sugru (if you don’t know, Sugru is a putty that will adhere things together when it dries). So, my friend has the idea to create little Lego posts that will go through the holes in the motherboard, and we’ll put bases on the bottom so the Sugru can get a good hold. And after several iterations, it works! The posts are capped off with-you guessed it-more Lego pieces, and the motherboard is fully stuck in place. Seeing that the Sugru worked for the motherboard, we use it to stick the PSU down too, but we don’t have enough left, so the second-best thing ever, duct tape, keeps it more secure. And somehow, it all fits, even with the screen.

Speaking of the screen, that thing was a hassle. We had to use garden clippers, pliers, and bolt cutters to chip away the many plastic ridges that were in the way. We cut it back the perfect amount, somehow, and the screen fit beautifully. Next, copious amounts for epoxy glue to hold it in, and we didn’t have enough glue for it to be truly secure, so I brought in the help of the best thing ever: hot glue. I slathered the glue on, and it never fell out again. The screen doesn’t have any of that CRT curve to it, but the gaps between the plastic and screen out of sight and no more than 1.5cm. One more fit test shows that it will work!!! However, there is very little room left in the case for the two (free) storage drives we were planning on using. But thanks to duct tape, we just slapped an HDD on the back of the screen and an SSD on top of the PSU and called it a day. It’s worked just fine so far.
The last internal components to get inside and working are the speakers and a little amazon DAC to replace the weird and annoying round speakers it came with. First though, we test the current build to make sure it actually works, now that we have the essential components in. And, eventually, after much anxiety and finicky-ness, it posts, and we’re in BIOS! We decide to put windows on it, because we may as well before all the speakers arrive and succeed at that too. The inside may look akin to an unknowable eldritch being, but it functions! And then it doesn’t :(. Turns out, the bend we made with the PCIe extender was too much for it, and it broke. So we ordered a new, more flexible one, and that one was the wrong orientation. SOOO, we (I) have the genius idea to link the two extenders together, with the flexible one bending and the other one going into the GPU. Fun fact: the original extender miraculously worked again, an continues to in its’ unbent state.

And the ‘final’ step-speaker installation. This is done with the majesty of hot glue, both for the speakers themselves and the little DAC that we glue onto the PSU. We wire it up with …wires, and perform a successful sound test (after resoldering one of the speaker contacts). We connect all the last loose ends up and begin the most stressful part of the entire project: reassembly. Everything’s at least 4 times heavier and 100 times more fragile. Barely remembering the order, we (mostly) gracefully put everything back together, having to make some modifications and cuts in some areas. Duct tape is used, and we have to reattempt putting in the screen apparatus a good 3 times.
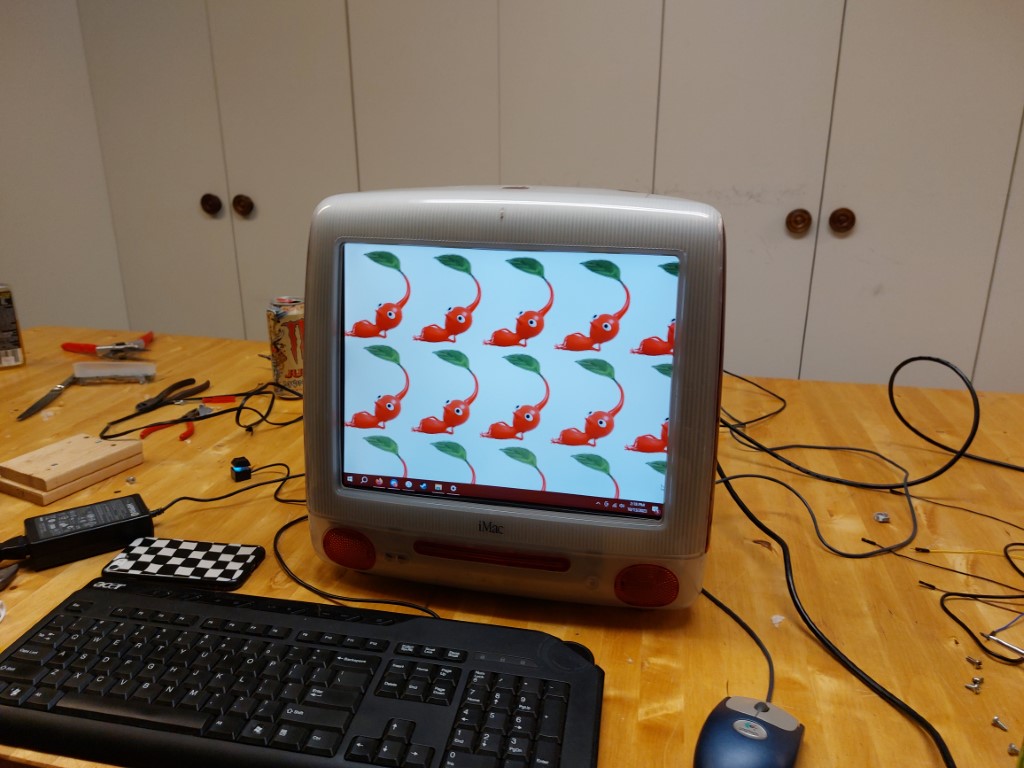
And then it’s done. It works, and after stress testing it, GPU temps are perfectly reasonable-high 70s-while CPU temps are a bit more worrisome-mid 90s. But its not a computer for NASA or crypto mining, it’s for playing older/pixelated games and some light schoolwork. It’ll do fine.
If you decide to do this project, or a similar one, here is my advice.
- If you can, use proper metal working tools to make and break brackets. The best we had was some heavy pliers, and this definitely limited what we could do and how well we could do it.
- Use only M.2 SSDs. We were on a budget, and so just used storage we had lying around, but using only M.2 drives would make an easier, lighter, and roomier build.
- If your CPU is going to used for intensive tasks, or is power hungry, put some focus into cooling. We are just using the provided AMD cooler, and it is barely enough in this closed off case.
That’s it! Thank you for anyone reading, and best of luck on any weird projects you may take on.
-Cav